millenniumartglass.com
Millennium Art Glass Company
(A division of fruitcratelabels.com)
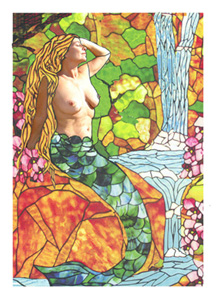
PAGE 2) SHANNON'S MERMAIDS
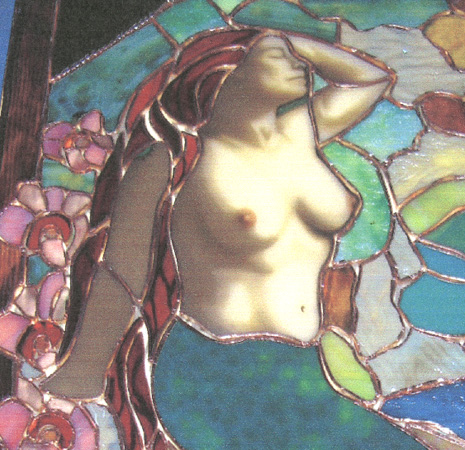
As 2007 began, I had enjoyed two years of part-time stained glass work and had built a dozen window panels. I was happy with the results and ready to start painting on glass and moving more into the realm of thinking about doing glass on more of a full time basis. My first project for 2007 actually started in November of 2006, when a dear friend of mine saw my "Deepwater" design and asked me to "make a red haired mermaid panel" for her. I suggested, I would rather make a mermaid window OF her. So, she posed in my backyard one sunny November morning, for the design which I then created in Photoshop with the help of an Aanraku mermaid idea she liked (from Aanraku Eclectic 11, drafted by George Baker). It took about 11 hours to create the design and then to size it and get the patterns printed for construction. I have worked in digital rendering as part of my label business, for several years, and this was my first such stained glass window design, using this technique which I plan to do a great deal more of in the future. This window would require all my skills AND painting on glass, too (something I had yet to learn. I had no idea what I was in for when I started!) This is the final draft of the pattern before production began. She is a blonde in the mock-up, but will be a red-head in the final window(s). (Copyright November 2006 Pat Jacobsen)
The first major problem was that I had never painted a female figure on glass before. The second problem was that I knew painting on glass requires special paints and a kiln, two thing I also did not have. But now I had no choice, because my friend expected a window! So, at the recommendation of Phil Teefy at Rainbow Glass in Sacramento ( www.glassglow.com ), I sought the tutilage of a master glass painter. Phil kindly contacted the famous airbrush artist and glass painter from Savoy studios in Portland, Raphael Schnepf, so I could go take some private study in glass painting at one of his workshops. I already had Peter McGrain's starter videos, and a number of books on glass painting and airbrushing (and one, brief class on airbrushing). But, Peter uses brushes and traditional methods, and not an airbrush. I also had two years of actually building panels, so I had a grasp of how panel production worked. Thaddeus said I could fire things in his kiln as I was getting started. Now all I needed was any artistic skill whatsoever. So, Phil put me in touch with Raphael and the countdown began.
After arranging to go to Portland to study with Raphael in February 2007, I cut out several sets of the torso, and arms from opaque Champagne soft water-glass and drove to Oregon to meet with him ( www.rschnepf.com ). One of the reasons for cutting several sets of arms and torsos, was that if one set broke or was cracked in the kiln when firing the paint, I would have another set (or two) to work with. But, also, I had agreed that if my friend posed for the window, I would make the window for her as a gift, which meant, if I wanted to show the window to anyone, I would have to make TWO IDENTICAL windows so we could both have one. It seemed a good idea at the time :) This meant I had to leave Raphael's with TWO painted sets of arms and torsos for two identical windows, both things I had never done before.
Before I continue the story, I want to HIGHLY recommend Raphael's workshops to anyone, novice or expert painter. I believe this SO STRONGLY, I have created a page that describes in detail my experience with his workshop and my private training as well. Here is the link Here are details about his workshop. art-glass3.html . PLEASE READ IT! But, on this page I will simply continue THIS story.
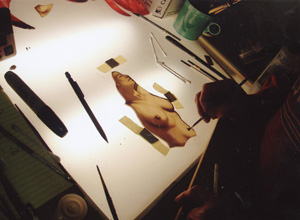
IN PORTLAND, The first couple days we airbrushed on Bristol board and on glass and fired a couple small starter projects, then after the weekend session we airbrushed roses on art-board, just to get some airbrush techniques together. These came out beautifully, so we decided to move on. The next day, we took the body pieces and Raphael painted one set and I painted the other following his lead. We used FuseMaster opaque lead-free enamel glass paints. (their LO Series colors http://www.fusionheadquarters.com .) For the next three days, we started with a fine layer of paint over the pieces, let it dry and removed the unwanted areas to leave the shading we wanted. Then into the kiln they went and were fired to 1350 degrees, soaked them for three minutes, annealed them at 900 degrees and then they cooled until the next day. .
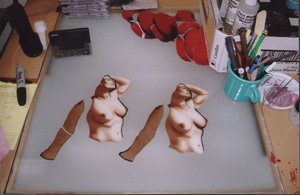
After three paintings and firings over three days, we had completed the body pieces, fired them several times and were mutually confident that the paint had perfectly "fused" into the face of the glass in a permanent way. We were both quite pleased with the results and we could barely tell the two sets apart from each other. This was fun for me, since I had not painted before, but more so because I had decided to create two identical windows, and I ended up with two sets of painted glass that were almost perfectly identical! (This proves what a remarkable teacher and artist Raphael is, taking a neophyte like me and pulling an artist out of it).
So, after working with Raphael for a week, I had a good friend, some new skills and some beautifully painted glass to make my two new windows from. This was VERY exciting, since I have only been building windows in glass for two years, and knew all along I wanted to paint to acheive the fine details of the feminine (and other) forms in my work. I packed all the pieces carefully in a box and took them home (with a heck of a lot of other glass I got at Uroburos, Bullseye, Cline's Glass Company (a fabulous store on Grand Ave in Portland who has everything...) and several stores and studios found elsewhere on my travels north).
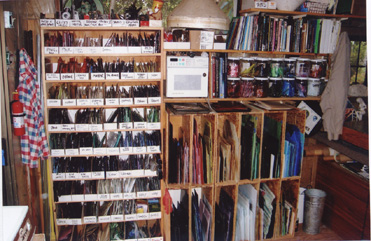
ONCE I GOT HOME: The next step, was spending about 60 hours in my little glass shop choosing, cutting and creating the layouts of the rest of the images. In the case of making two identical windows, I had to chose glass that "worked" with the overall image and had to pick glass from my archive that I had enough of, that I could cut one piece, then a SECOND piece immediately next to it, so both windows would have the identical color, style, grain, opalescense and so on. (NOTE: Even though I have only built windows for 2 years, I have collected scrap glass up and down the Pacific Coast for almost six years in HOPES of doing something with it.)
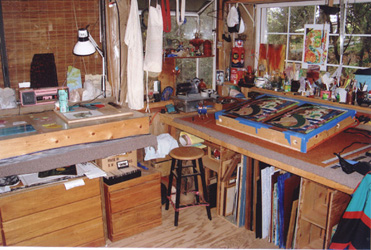
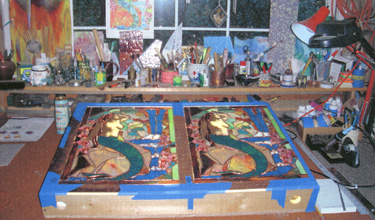
This was a fun challange to try to make two windows that were so close to each other, I could put both of them in front of my friend and let her choose which one she wanted. Only I would know which torso Raf had painted and which one I had painted. So, to be fair, I made both windows equally well so no indication would lead her decision toward one or the other, building them side-by-side simultaneously on the same light table.
Once all the glass was chosen, cut, ground into shape, and set into place, which took several days to do. Then after completing the designs, I decided to replace some of the pieces with different colors, adjusting the design as I went along. Once that was complete, the next step, of course, is to copper foil all 430 pieces, then solder, frame, clean and patina them. This took a couple days to complete the foiling and soldering. I can't describe the joy I was feeling taking the original idea of twin windows, and painting on glass a beautiful woman, which is the goal of my work at this time. Day after day, I was able to revel in the accomplishment, which was something totally new to me. So, I put in late hours and lots of care into every step and decision. It took about 80 feet of copper tape to wrap both windows, and a roll and a half of 63/47.
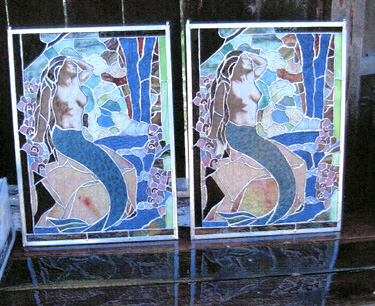
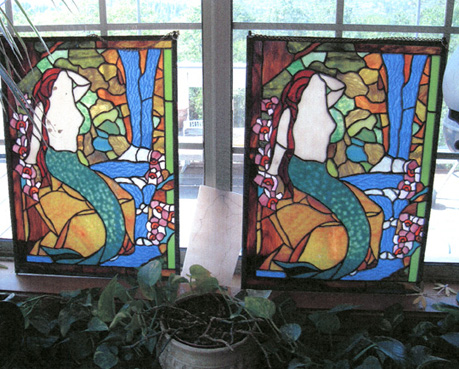
Finally, they were ready to frame in zinc and the be cleaned of dust, glass particals and flux. So, I grabbed a nail-brush and some Windex and carefully washed both windows on my outdoor work-bench and rinsed them off with a hose very gently. And, since I had photographed the project all along, I grabbed my camera and took a picture of both of them at this penultimate moment of their creation. They had survived firing, transporting from Oregon, the construction process and the brisk cleaning with a brush. I could not believe that I had created these and how great it made me feel, and how much my friend was going to enjoy having a window of herself, which she had YET to see any part of since the day she had posed for it five months earlier. And, I would have one window of my own, to show folks who might like to commission my work. It was also a great moment in my life to know Raphael and I had become friends, and to have acheived something I had no idea I could even do! But, here they were.. minutes before I applied the patina.
March 29, 2007: The final step after taking this picture, was to lay them flat and patina the silver-looking zinc frames and solder lines, as I had done with ALL my other previous projects. The product I had used for the two years since I made my first window, was "Novacan Black Patina for solder and lead" made in Vancouver, British Columbia, Canada and comes in a plastic bottle. It contains "nitric acid and selenium compounds" and had done a marvelous job on all my other windows.
So, I laid the windows on their faces and patinaed the back sides then sprayed them with the hose, and they looked perfect. Then, I flipped them over, laid them flat, and began brushing the patina on the front side. But the front side of the glass had loose water on it and the patina spread into that water and flowed slightly over the painted area of the glass. As always, I let the patina sit for about two minutes, which always worked on my other windows. The very last step was to stand them up and gently spray the excess patina off the windows, and carry them up to be placed in the window of my home. My friend was coming over the next morning for the unveiling and to choose her window.
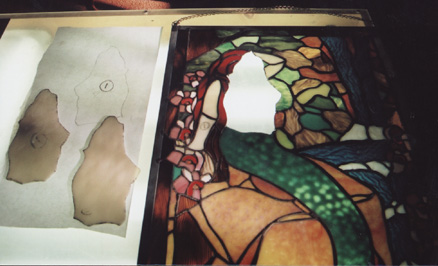
So, I stood the windows up and gently sprayed them with a fine mist of water. AMAZINGLY, AND TO MY SHEER TERROR, ALL THE PAINT THAT RAPHAEL AND I HAD WORKED SO HARD ON, WASHED AWAY BEFORE MY EYES. AND THE COMPLETED WINDOWS LOOKED FANTASTIC, BUT, HAD ZERO ARTWORK ON THEM ANYMORE!!!!! ALL THE PAINT WHICH SUPPOSEDLY HAD FUSED INTO THE PARENT GLASS, WAS GONE IN AN INSTANT!! YES, TO SAY I WAS UPSET AND HEARTBROKEN IS A MASSIVE UNDERSTANTMENT. FIVE MONTHS OF WORK, AND ALL THE SUCCESS I HAD WORKED TOWARD FOR SEVERAL YEARS, WAS GONE IN ONE INSTANT. Words cannot describe the feelings I had at that moment. UNFORTUNATELY, THE NOVACAN LABEL SAYS nowhere upon it: "warning do NOT use this product near enamels, because it eats them completely off the glass. But the worse problem, was that I learned THEN AND LATER, too, the FuseMaster enamel itself, had NEVER fused correctly into the surface layer of the glass, even though we cooked it at 200 degrees higher than was recommended just to assure its adhesion. (It is also possible that the Champagne water glass I used may have inhibited this adhesion, as well.)In a state of panic and shock and disbelief, tears in my eyes, an ache in my heart and completely devastated, I carried the windows up to my home, placed them in the window and took this picture of my finished months of work. One window was completely washed clean of paint, and the other was left with a series of blotches which remained. I called my wife to tell her what had happened and she thought it was an April-Fools joke...... (Still today, seven months later, it breaks my heart to look at this photo)
NONETHELESS, In the ensuing torent of investigation into what had happened and why, I learned from many renown glass painting artists that you "never put patina anywhere near painted glass." "We learned our lesson about patina YEARS ago." Yet, no one had mentioned it BEFORE hand in the videos, nor the books I had read, nor online in ANY articles I read about glass painting. So, I decided to write this article to warn future glass painters about this horrifying truth. Part of my job now as an artist would be not only to learn about creating the kinds of works I want to, but I would share all this with other artists, so the same fate would not befall them!!! I learned a horrible lesson the hard way about painting on glass and what happens when you use patina as the final step in a stained glass window. I would HATE for anyone to learn the same lesson I did and in such a crushing way! In my case it was a double horror, because I made two identical windows and BOTH were ruined by Novacan Black patina, in the same way and at the same moment. Since this happened, I have spoken with several legendary glass painters, Richard Millard, Raphael Schnepf, Peter McGrain, Debra Coombs, a couple technicians at Savoy Studios, several career glass wholesalers, stained glass fabricators and glass shop owners, the lead technicians at Fuse-Master and Reusche and many others in the stained glass industry, including the folks who make glass-painter's-enamels and silver-stains..., and they all said "NEVER use chemical patina on stained glass. It is NOT compatible with painting on glass." OOOOOPS!!!!! The bummer is, no one mentioned it BEFORE this happened, not in any literature, not on the product packages, NOWHERE!!! Heartbroken, this all left me with the gnawing question, WHAT TO DO NOW?
WHAT I WILL DO NOW IS START A LOG OF WHAT I HAVE LEARNED ABOUT THIS AND SHARE IT HERE AND ON SOME STAINED GLASS FORUMS ONLINE.
(6/2/07) So, what is next...? In the past 60 days, I have recovered from the shock, and continued my research into glass painting. I also studied FuseMaster paints and Reusche paints. I also ordered a kiln from Phil Teefy and Rainbow Glass, one of the best kilns in existance (www.glassglow.com ). I built a shed outside and wired it with a 50 amp circuit. I have spent days and days on the Internet and phone contacting glass painters across America learning how to avoid such problems in the future. I have acquired more glass painting videos and further articles from the Internet. MY NEXT STEP is to take the windows back to the shop and using a soldering iron and some copper "wick", I have to place the windows face down, and remove the solder around each of the five pieces in each windows (10 pieces altogether), and bend back the copper foil and gently lift out the pieces costituting her torso and arms. Thank goodness the rest of the windows are still perfectly fine and ready for display.
These two 5-piece body structures will need to be cleaned (yes, with more patina) to fully remove all the previous paint. Then I will begin re-painting them a second time and firing them again. The first time Raf and I did this, it took about 45 minutes to spray and edit the layer of glass-paint and then the rest of the day to fire and cool the glass. So, I have three or more days of work ahead of me. Each day, I will repeat this with a second layer of paint, and again the third day, and so on. If all goes well, I will have reproduced the images on all the glass pieces and then they can be set back into the holes from which they came, the copper foil can be bent back over their edges and they can be resoldered. In the picture above, you can see some splotches left on the left-hand window which the first acid-attack did not fully destroy. That had to be removed and, of course, what better to use than more patina.
I am determined to re-do these windows to their original glory or better. I don't plan to vary the process, nor the paints, firing patterns or anything else. I plan to repeat the exact steps that were used in their original creation, so as to retrace my footsteps and complete them as intended originally. EXCEPT YOU CAN BE SURE I WILL NOT PATINA THEM AGAIN! Once they are completed, my friend can come over (again) and choose the one she wants. After that I will launch myself fully into new techniques of painting, new types of glass paints and learning about my new kiln and it's capabilities. I have about 10 designs ready to go, which I would already be working on. However, I would need a kiln one way or the other to move on, so it is probably a blessing this happened NOW, so I had to research a kiln and acquire one, rather than depend on the kilns of other local artists and potters.
One result of this process was something my wife said..."It is probably a good thing this happened to you on your own window and at this point in your new career. It might have happened on a commission or a restoration on someone ELSE'S window, and then you would have been in real trouble." This is making lemonade out of lemons, I agree, but, it is sound advice. Still, I could have done without the shock and heartbreak. A MINOR lesson would have sufficed, not the complete destruction of my painting and my dream. However, there is always tomorrow. And with that, I will close for now and come back later with an update to has this story ends.
My advice "EVERYONE, STAY THE HELL AWAY FROM LIQUID PATINA ESPECIALLY IF YOU PAINT ON GLASS." There are other techniques, and later, as I learn them, I will share the here and one a few forums: Including www.warmglass.com and www.stainedglassforum.com on Yahoo run by Dick Millard, and www.stainedglasstownsquare.com. Until then: Best to you all -- Pat (6.3.07)
(7/20) Hello again. It's now late in July and I have learned from the owner of Reusche & Co. in Colorado that "all enamals, no matter what kind, are subject to damage from patinas with acids in them. The paints with lead are more durable and weather resistant, and of course, all transparent enamels have lead in them. But ALL enamels sit on top of the glass, they never fuse into the surface of the glass unless the glass goes completely to its liquid form, but at that point the enamel may burn off, the glass "flash-over" and lose its native color ("strike"), and it may even slump, shrink, distort or expand. Only silver stains are acid resistant. The lead-free Fuse-Master enamel I used is probably zinc based and has nowhere near the durability that lead based enamels do. Someone should have told you that in the beginning, that no enamels are safe from acids."
(10/3) And, hello again! It is now early October. About two weeks ago, I started the process of removing the torso sections from both windows. The process required a small wire brush and vacuum to clean the lead lines, then a hot soldering iron, a solder-sucking tool (used in electronics), a "C" shaped hook/pick tool, a razor-blade scraper, a small hammer and chisel, a brush, some gloves (because of all the lead being handled) some adhesive solvent (Bestine) and 8.5 hours of patients, care, stress and sweat. I had to remove all the lead around the torso and then cut the tape off the surfaces, leaving the tape down in the cracks between the glass. The C pick is used to coax the tape up out of the cracks which is a very nerve-racking procedure. One slip and the whole piece breaks. I actually broke one torso on a corner, and one piece of red hair NEXT to the torso on the second window, which will have to also be replaced. The other torso came out fine. It seems to me this removal process is about comparable to giving birth..... "Breathe. Breathe. POP... it's out."
The right arms are so far from the center, I am going to leave them in place and airbrush them later with enamel paint that does not need firing. The left arms over the forehead, I will also (probably) remove and re-paint and fire with the torsos. It took 4 hours per window to remove just the torsos, but the arms are proximate to the opening in the window, so they should only take a few minutes (half hour each) to remove, clean and prepare for re-painting. Now the two windows sit in my front winhdow without the central pieces.
Ironically, I had to use, yes, black patina fluid, to remove the paint still remaining on the glass, which was left after the first disaster. If nothing else, black patina is good for that. It took the remnants right off so now the glass is clean again for the repeat painting and firings. Earlier, I had hoped to bend back the tape and set the pieces into the holes. But, I now find the pieces will all need to be re-taped and soldered into place again, Then I will have to PATINA the edges, only this time with a TINY amount on a Q-Tip and with a shield around the glass. More about that later on a new page, as my education evolves. -- Pat
Next Page for the happy ending
(Last update: 10/07 )